Editing allocations
The Manage and Process Data > Add or edit allocations page allows you to update allocation rules, create and edit groups, and change an allocation's run order.
You can edit a single allocation, or use the bulk editing features to apply changes to multiple allocations at once. For details on editing groups, see Using allocation groups.
NOTE: You cannot change the description or category of an allocation once you have saved it.
To edit a single allocation:
- Click Organizational Profitability on the FI Command Center home page.
-
On the Manage and Process Data tab, click the Add or Edit Allocations sub-tab.
-
Click the check box in the row for the allocation you want to edit.
-
Click the Edit icon
 in the toolbar.
Click image to view full size
-
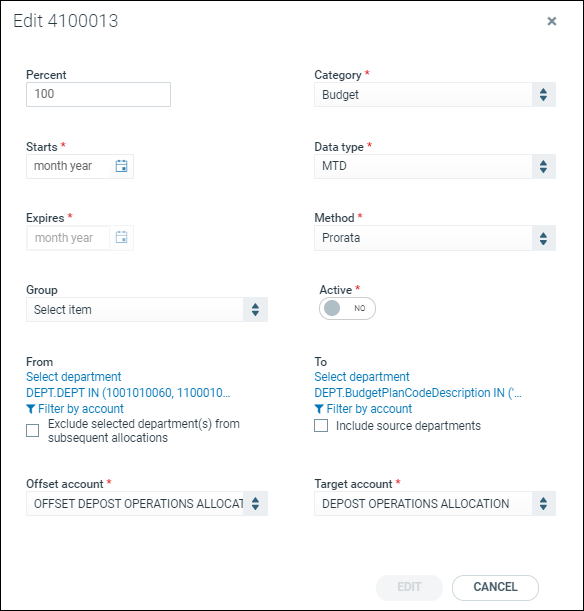
In the Edit Allocations dialog box, update the following fields as needed:
Field Name Description Percent Enter the percentage to allocate to the target department. Starts Click the calendar icon to select the month and year to begin processing the allocation. Expires Click the calendar icon to select the month and year to finish processing the allocation. Group Select a group in the Group list, if desired. Category Select a category from the following options:
-
All — type of allocation that contains settings common to actual, budget, and forecast allocations. When selected, all four types of allocations will be displayed.
-
Actual – allocations generated for ACCT and DEPT.
-
Budget – allocations generated for BudgetACCTRollup and BudgetDEPTRollup.
-
Forecast – allocations generated for ForecastACCTRollup and ForecastDEPTRollup.
Data type Identifies the data types that the rule will use to allocate GL records. Select one of the following:
- MTD – income and expense accounts.
- EOM – ending balances.
- AVG – average balances.
- FTP – FTP records.
Method Select from the following methods:
- Pro rata – the allocation engine spreads the cost pool to target departments pro rata based on the Allocation Basis Data filter.
- Even – the allocation engine spreads the cost pool evenly to target departments defined in the Target Department Data filter.
- Rate Volume – this allocation method is used by organizations to allocate costs to target departments based on standard cost rates. Cost rates for the given allocation ID are defined by month in the AllocationUnitRate table. The allocation engine calculates the amount to allocate to target departments by multiplying the allocation ID unit rate for the month by the amount defined in the Allocation Basis Data filter.
Active Slide the toggle to Yes to enable the allocation. Slide it to No to disable the allocation. From Click Select department to define the source of the cost pool. See Using the Filter Wizard for information on how to apply filters.
NOTE: This field may be required depending on the method you select.
Exclude selected department(s) from subsequent allocations This option controls the allocation of costs from one allocation department to another.
- When selected, all departments included in the Cost Pool Data Filter - Department setting will be excluded from the Target Department Data Filter setting for all subsequent allocation rules, as defined by the Run Order setting.
- When cleared, during allocation engine processing, all departments defined in the Cost Pool Data Filter - Department setting can be included in the Target Department Data Filter setting of all subsequent allocation rules, as defined by the Run Order setting.
Offset account Select an account in the drop-down list.
IMPORTANT: The offset account must be the same type—income or expense—as the target account. If the offset account is not consistent with the target account, the system will co-mingle income and expense for offset calculations, rendering results invalid. (The AAIO Axiom allocation income offset account account type is used for income offset accounts and AAO Axiom allocation expense offset account for expense.)
To Click Select department to define the target departments. See Using the Filter Wizard for information on how to apply filters.
NOTE: This field may be required depending on the method you select.
To account filter data type Select the data type for the account selected in the To: field. Options are:
-
AVG
-
EOM
-
MTD
-
STATS
NOTE: This field only appears when you select Prorata in the Method list.
Include source departments Do one of the following:
- Select this option to make cost pool departments eligible to receive a portion of their own cost pools when they are included in the Target Department Data filter.
- Clear this option to make cost pool departments ineligible for an allocation.
Target account Select an account in the drop-down list.
NOTE: The AX_AcctType assigned to the target account is used by the allocation engine and the Cost Allocation Operational report to identify an allocation rule as income or expense. Selection of this value is, therefore, critical to the validity of allocation results. (The AAI Axiom allocation income account account type is used for income target accounts and AAE Axiom allocation expense account for expense target accounts.)
-
- Click Edit to save your changes and return to the list of allocations.
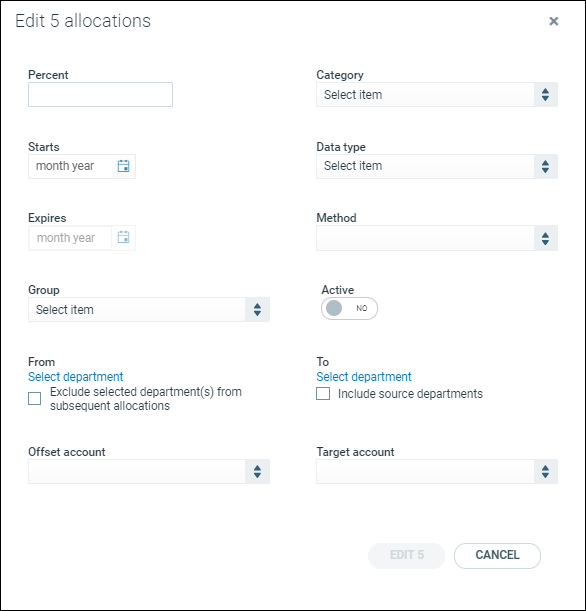
You can edit multiple allocations within a group, or individual allocations that have not been assigned to a group.
NOTE: Bulk editing is only available for allocations of the same category (Actual, Budget, Forecast).
- Click Organizational Profitability on the FI Command Center home page.
-
On the Manage and Process Data tab, click the Add or Edit Allocations sub-tab.
-
Place a check in the check box column for the rows you want to edit.
NOTE: To select all allocations in a group, place a check in the Group row check box.
-
Click the Edit icon
in the toolbar. 
Click image to view full size
-
In the Edit Allocations dialog box, update the fields as needed. For details, refer to the table above.
- Click Edit to save your changes and return to the list of allocations.
-
Click Save on the main Add or edit allocations page to save your changes to the database.
Changing the run order of an allocation
You can change the run order of an allocation with ease. Subsequent allocations will be adjusted automatically.
NOTE: Run Order is unique for each category; that is, you may have a Budget allocation or group with a run order of 1 and also have an Actual allocation or group with a run order of 1. When you change the run order of a group or allocation, only subsequent groups or allocations of the same category are adjusted.
To change the run order:
- On the Manage and Process Data tab, click the Add or Edit Allocations sub-tab.
- In the Run Order column of the allocation you want to change, enter the new run order number.
- Press Enter. The run order of the allocation you changed and all other allocations of the same type will be updated.
- Click Save.
